

Fun with Loose Glitter ✨✨

Fall is fast approaching and what better way to welcome it in than with Glitter Nails!
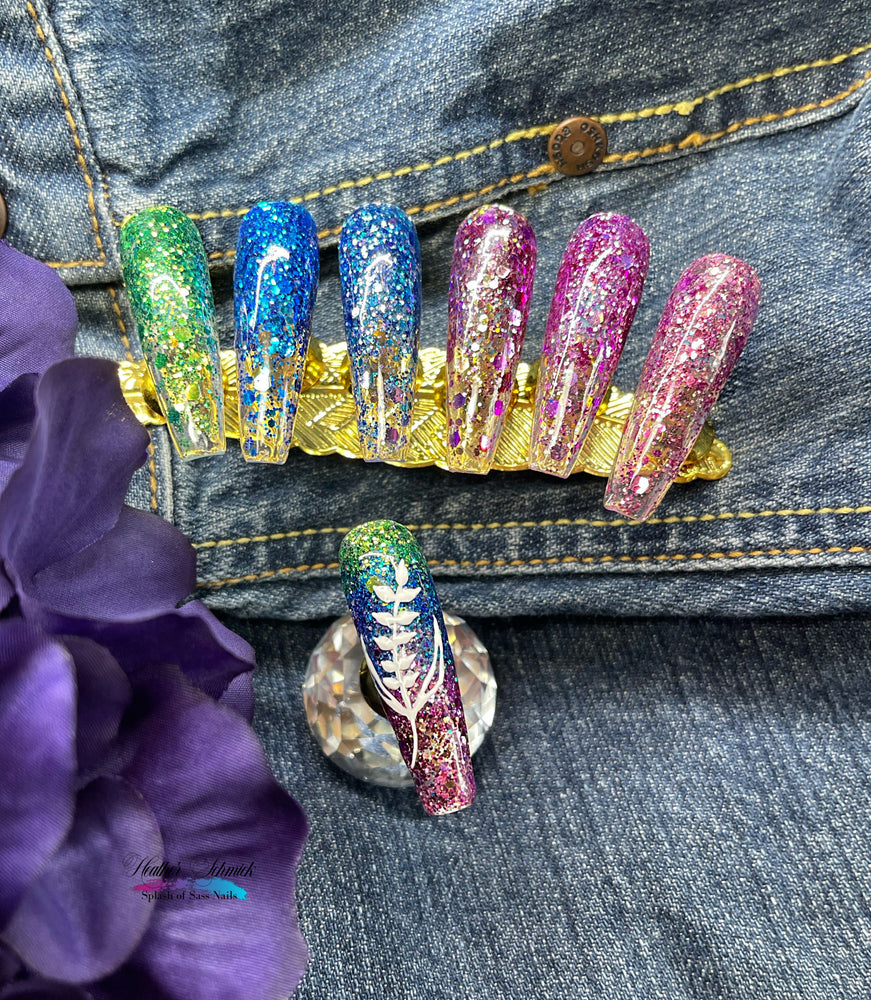
Koko and Claire have given us several gorgeous loose glitters in their Sprinkles Collection and this set of 6 Fall Glitters are no exception, they are so sparkly.
I know a lot of people shy away from loose glitter, especially chunky glitter. Many are unsure how to apply them and get a smooth finish without a thick nail.
Hi, I am Heather from @splash.of.sass.nails and I use loose glitter often in my nail studio. There is nothing more amazing than the depth and dimension you can create with loose glitter. I am going to give you an easy way to apply loose glitter to your nail all while keeping it smooth and beautiful.
And as an added bonus I will show you a simple hand drawn art technique, for those of you that need that something extra!
Here is a list of what you will need to Glitter Up your Fall Nails:
- K&C Fall Sprinkles - you can use as few or as many different colours as you
- K&C Gel Polish, I used white #049 Frosting
- K&C Base Gel
- K&C Shine Top Coat
- K&C Strong Gel - this is optional
- K&C Cleanse
- K&C Detail Brushes
- File and Buffer
- Gel Brush - an old one works great
✨ Let the Glitter Magic Happen! ✨
Step 1
- Prep and Cleanse your nail as usual
Step 2
- If you like to file off your gel, I always prefer to have a base protection layer. So place a thin layer of K&C Base Gel and Then place another layer of Base Gel but Do Not Cure
- If you prefer to soak off your gel, then you can just put one layer of K&C Base Gel but Do Not Cure it yet

Step 3
- Select your first colour of glitter and tap it into the uncured base coat with a brush
- Keep adding glitter in the rainbow order of your choice until the entire nail is covered to your liking
- Don’t have a brush? You can also use a dotting tool or silicone I just prefer a brush.
- Once all the glitter is applied, you can put your nail into the lamp for a full cure.


**Tip**
Glitter is messy and will make a mess of your brush, so picking a brush, even an older one to be your designated glitter brush is a good choice.
Step 4
- This is how we encapsulate and hide the glitter under the gel so your nail is smooth
- Taking your K&C Strong or Shine, place a thin layer over the entire nail, but do not cure
- Now take a larger amount of the same Strong or Shine and lightly float it over the nail
- This layer doesn’t need to be thick, but it does need to cover all the glitter and fill in any dips and holes
- Don’t cure just yet!!

Step 5
- This is my favourite step in making your nail smooth
- Now tip your nail upside down, making sure it is Do this for 5-10 secs
- This will allow the gel to dome above the glitter and leave a much smoother look
- Quickly Flip your hand back up and do a full cure in the lamp

Step 6
- Using your K&C Cleanse, wipe off the sticky dispersion layer
- This glitter is fairly chunky so filing will most likely be needed to get the little rough spots still sticking out
- Take your file and buffer, lightly file all edges and the top of your Until it feels smooth and no glitter can be felt.
- Then clean off the dust

Step 7
- If you love the look then you just need top coat, apply K&C Shine Top Gel and Cure
- Wipe off the sticky dispersion layer and your beautiful nails are ready!!
- OR****If you want to add an extra pop of art then keep on reading to the next step

Step 8 (art time)
- This can be done directly after filing & cleaning off the dust, or on top of any top coat
- Take K&C Gel Polish, I used white #049 Frosting
- Add a large drop of the gel polish to a mixing tile or anywhere clean that is easy to remove the gel polish from when done
Step 9
- Let’s draw an art design - - maybe a little wheat stalk for fall
- Take your K&C Detail Brush
- Detail Brush #1&2 work well for short small lines and Detail Brush #3 works well for longer lines, but you can use any detail brush for either if you prefer
- Load your detail brush with gel polish - meaning run the bristles of the brush through the gel a few times to give it a very light coating of gel. Make sure there is only a very small amount all down the bristles
Step 10
- Take your loaded long detail brush #3 and run it through the gel again, picking up a larger This will be for the stem of your wheat.
-
Draw a line for the nail. Repeat if areas need more gel. Your line doesn’t need to be straight, let it have some flow to it.

- Now take your shorter detail brush # 1 or 2 and pick up a tiny ball of gel just on the very tip of the brush
- Place that ball down near the top of your stem and drag it out so it forms a teardrop shape

- Continue to place little teardrop shaped gel along the sides of the stem.

- Draw on leaves with the longer detail brush #3 using the same technique as you did with the stem

**Pro Tip**
FLASH CURE your art. Cure the gel polish for 5-15 secs after every few art steps. This cures the gel just enough so it doesn’t move and if you make a mistake on another area it’s easy to just wipe it away.
Step 11
- When you are happy and finished with your art design remember to do a FULL Cure of the gel polish, even if you did several flash cures, a full cure is necessary.
- Then add K&C Shine Top Coat and cure.

Your nails with art are Done!!
Now did that make using loose glitter seem easier? I hope it did, and if you have any questions, please reach out to us.
I can’t wait to see what you create with the Sprinkles glitter, and remember to tag @kokoandclaire #KKCPolish and myself @splash.of.sass.nails on social media so we can see and share your beautiful glitter creations.
Happy Fall Everyone!
Heather