


As we say goodbye to the winter season (finally… am i right?!), the snow starts to melt, the clouds begin to dissipate and the flowers begin to pop out from hibernation. Of course with so many gorgeous colours from Koko & Claire releasing this season, I can’t help but to feel inspired by the spring and the beauty of nature around us.
I'm Giselle from @egobeauty.ca and today I will show you how to create a gorgeous floral embossed design so you can watch your nails bloom like spring after a long winter.

First things first, here's a list of what you will need to recreate this look:
- K&C gel polishes:
#445 Just For You from K&C’s Speckled Stone Collection
- A medium detailer brush (K&C Detailer #3 works great).
- Nail art powder
- K&C Shine Top Coat
Other gel polishes used in the full set design:
- K&C Matte Top Coat
- Gel polishes:


Now, onto the steps! ⬇️ ⬇️ ⬇️
(Click here to watch a video demo of this technique)
Step 1:
Start with a base of your favourite shade from K&C’s Speckled Stone Collection, I am using #445 Just For You. This will be the background for our flowers so consider choosing a shade that will contrast with the colors picked for the florals and make sure to do as many coats as needed for full opacity, I did 2. Then finish off with Shine Top Coat.

Step 2:
Well be creating some green leaves so using #259 Green Tea and K&C’s Detailer #3 start by painting the stem, place the brush lengthwise at the centre of the nail and drag out at an angle.


Then create the leaves with a drop like shape, starting with a speckle on the side and then connecting it to the stem by dragging the brush towards it.

Repeat the drop-like shapes in different sizes to create the illusion of several leaves on the stem. Do not cure the design just yet.

Step 3:
Once you’re happy with your leaves, go ahead and sprinkle some Nail art powder over it, make sure to wait for the powder to absorb into the gel polish and continue to sprinkle some more until fully coated. Then go ahead and cure and once cured you can dust off the excess powder.


Step 4:
Next, we’ll create a rose in the centre of the nail. Using #310 Hotsy-Totsy and a dotting tool, place a drop of gel polish and spread it to form a bigger speckle. Then while the first speckle of gel polish is still wet, pick up a drop of #152 Lil’Lamb, place it in the centre of the first speckle and swirl it counter clockwise. Cure and wipe off the dispersion layer.

Step 5:
Now that we have the base for our rose, we’ll repeat the process of creating the embossed effect for this floral as well. Using K&C’s Detailer #3, paint small C-like lines starting from the centre and wrapping them around towards the outside of the speckle, this will create the illusion of petals for our rose. Then while still wet, sprinkle some Nail art powder and cure. Then dust off the excess powder.

Optional:
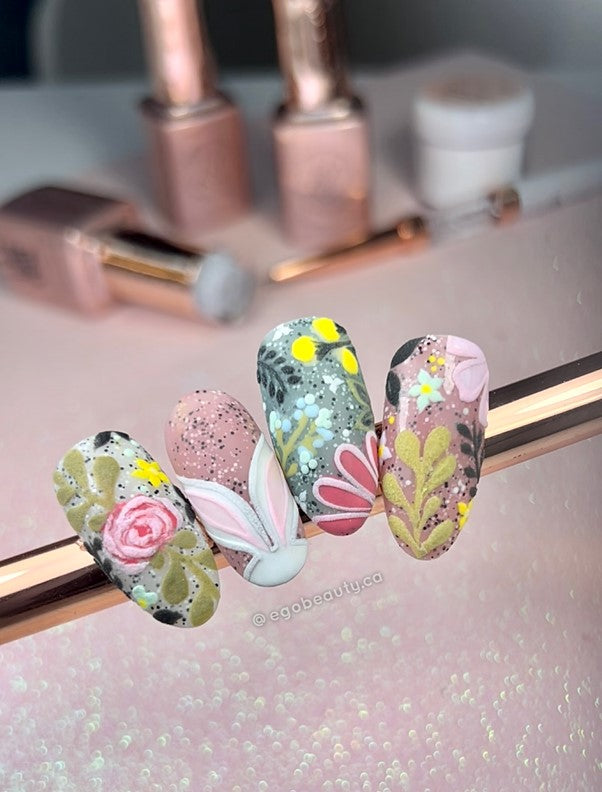
You may continue repeating the process of painting extra flowers and sprinkling them to create all kinds of floral patterns. Combine the use of different color backgrounds with flowers in varied sizes and shapes to create a complete set and voila! You’ll end up with a ready for spring design.

(Click here to watch a video demo of this technique)
I hope you’ve enjoyed this design, follow me on Instagram @egobeauty.ca for more tutorials like this, I hope you give it a try and when you do, make sure to tag me and @kokoandclaire on social media so we can see and share your beautiful creations.
Until next time, stay creative!! Xxo
Giselle 💗💗💗


